In any DragonQuest world, individual combat is an inevitable
(and sometimes necessary) occurrence, and the players should be
aware of its dangers. Fighting is a deadly process and should be
avoided if at all possible. Heroes are made by defeating the
dragon, but more graves are dug than heroes made. The DragonQuest
combat system reflects these dangers and emphasizes skills and
smarts over brawn and brutality.
Combat occurs whenever characters, non-player characters, or
monsters attempt to physically overcome or harm other conscious
opposing figures while on the Tactical Display or in the Chase
Stage (see rule 154). Combat should not occur whenever entities
simply encounter one another; rather only when some overtly
hostile action has taken place or intentions are made clear.
When combat has begun (whether both sides are aware of each
other or not), the GM should set up the Tactical Display and have
the players place the pieces representing their characters on the
display with the GM being the judge as to their final
positioning. The pieces representing the hostile figures are then
placed by the GM and the combat sequence begins.
Combat time on the display is divided into 5-second Pulses
during which all figures may attempt to take various actions,
depending on their positions relative to the hostile figures. The
order in which these actions take place is determined by the
figures' Initiative Value (for engaged figures) or by an
Initiative Die Roll (for non-engaged figures). Attacking is
resolved by rolling D100 versus the attacker's modified Strike
Chance with his weapon. If a hit results, any damage is generated
by rolling D10 and adding modifiers by weapon type.
When all figures occupying the display are either dead,
unconscious, incapacitated, or friendly towards each other, combat
is over. Combat should never last any longer than necessary to
resolve the situation; returning to the Trek/Wait stage (see rule
154) as soon as possible will speed overall play.
The following terms are used throughout the combat rules.
Action: The movement and/or combat activity a figure
may attempt during one Pulse. The number of actions a figure
attempts during a Pulse is a function of his modified Agility.
Attacker:The figure taking action in an
engagement.
Attack Zone: Any hex into which a figure may Melee or
Fire attack.
Base Chance, BC: The percentage chance for one figure
to strike another with a weapon; listed for each weapon on the
Weapon Chart.
Blocked Hex: Any hex which contains enough solid
matter to block any attack. The Attack Zone of a figure cannot
extend into a Blocked hex.
Close Combat: Any combat involving figures mutually
occupying the same hex.
Combat Action: Any action taken by a figure occupying the
display while in combat. Choice of actions may be limited due
to position relative to hostile figures.
Damage Check: A roll on a D10 to determine the amount of
damage done after a successful hit.
Damage Points, DP: The amount of damage (expressed as a
number) done as a result of a damage check.
Defender: The figure on the receiving end of any attacker's
action.
Effective Damage: Any Damage Points (to either Fatigue or
Endurance) which are actually inflicted on the figure hit;
this does not include points absorbed by armor or ignored due
to other considerations.
Engaged: Hostile figures occupying adjacent hexes are
engaged.
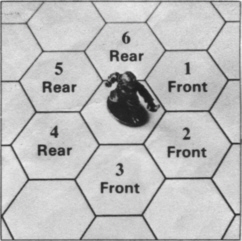
Facing: The placement of a figure on the display such that
it unambiguously is oriented towards one hex, termed its front
hex. Once this orientation has been performed, a figure's front
and rear hexes are determined.
Figure: Any sentient entity occupying the display.
Fire: To throw or fire a weapon or spell in :Ranged
Combat:.
Grapple: The act of striking a figure in Close Combat.
Grievous Injury: An injury suffered which results in the
maiming or temporary incapacitation of a figure.
Line of Fire: A straight line drawn from the center of an
attacking figure's hex to a target figure's hex which passes
only through hexes of the attacking figure's Ranged zone and
is not blocked.
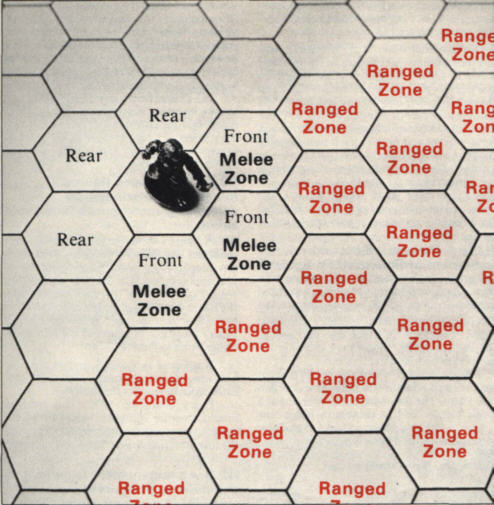
Melee Zone: The front hexes of any conscious, unstunned
figure armed with a weapon rated for :Melee Combat:.
Modified Agility: The figure's Agility after it has been
modified due to weight carried (see rule 156.9) and armor worn
(see rule 25.1).
Modified Manual Dexterity: The figure's Manual Dexterity
after it has been modified due to type of shield carried (see
rule 24.5)
Obscured Hex: Any hex into which a figure normally cannot
see but which objects may pass through. A figure may attack
into an obscured hex but cannot fire through it.
Prepared Item: Any item (weapon, shield, flask, etc.)
which a figure has in his hand(s) and can readily use.
Pulse: A five-second increment of game time which regulates
actions while on the Tactical Display.
Ranged Zone: The hexes radiating out from a figure's
front hexes into which that figure can see and fire a weapon,
spell, etc.
Sheltered Hex: Any hex containing physical objects behind
which a figure could take shelter such that approximately half
of his body is protected from any attack.
Strike: The act of attempting to hit a hostile figure.
Strike Chance: The chance of hitting a hostile figure with
a weapon; it is a combination of the Base Chance, Manual
Dexterity and Rank.
Strike Check: The roll on D100 to see if the attack was
successful.
Tactical Movement Rate, TMR: A figure's Movement Allowance
in hexes per Pulse while on the display.
Weapon: Anything used to strike a hostile figure.
To aid in the resolution of combat situations, the players and
the GM should have a number of items close at hand. If these
items are prepared before combat begins, the entire process
will take much less time to resolve.
The
Tactical Display is used to locate and regulate the movement of the
figures involved in combat. It consists of a 1 inch (25mm)
hexagonal grid. Each hex represents 5 feet of space from side
to side. A number of photocopies of this display should be made and
butted together to form large areas. The GM may wish to cover the
display with a clear plastic (contact paper or acetate) to allow
drawing on the display with china pencils or other erasable markers.
If
the GM wishes to use a 1 inch (25mm) square grid instead of
hexes he may, but should resolve any rules anomalies himself.
(Diagonal movement on such a grid can misrepresent actual distances
moved.)
When
representing figures on the display, some form of markers must be
used. Often lead miniatures (available from most hobby stores) are
painted to represent players' characters. Cardboard counters are
equally useful, with counters being much less expensive but also
much less visually exciting. Beginning players often find the three
dimensional quality of miniatures helpful in visualizing what is
actually occurring during combat. Game masters will find that trying
to collect an arsenal of appropriate monster miniatures grows to
become inordinately expensive, and numbered counters may be used.
Special monsters, painted and prepared by the GM for a particular
encounter, are useful to spice up an adventure.
The
GM should have a copy of a completed Adventure Record and the
players should have their Character Records. These contain
information that will be used continuously during combat, such as
strike chances, movement rates, etc. If any non-player
characters or monsters are involved in combat, the GM should record
their characteristics and information on a piece of scrap paper or
index card. This information should be determined prior to the
adventure if at all possible. Any damage taken in combat should be
recorded on a piece of scrap paper rather than on the Adventure or
Character Records.
Percentile
dice are used in the resolution of combat, and plenty should be
available (one pair for each player and the GM is ideal). Also,
copies of all the combat charts and tables should be made so the
players may readily refer to them. The GM will often use a screen to
hide his die rolls, papers, etc., and the most commonly used charts
and tables may appear on it.
Whenever
it has been determined that combat in some form is an inevitable
result of an encounter, the GM must set up all the equipment
necessary for the resolution of combat (see rule 17). It is
important for the GM to be as organized as possible (have monster or
non-player character characteristics and weapons
pre-generated, have miniatures or counters ready, have the
encounter area mapped to facilitate easy transfer to the display,
etc.) so the set-up time for combat goes quickly. Knowing
combat is coming, the players will get more excited in anticipation,
and now is not the time for the GM to fumble with his notebook. Each
player should have his playing piece and Character Record prepared
and ready. There should be as little fuss as possible when placing
pieces on the display, and the GM has the final word as to the
placement of all characters, non-player characters, and
monsters.
If
the GM has prepared the display to accept either china pencils or
markers, he should draw in the details of the encounter location.
This may be a hallway in a dungeon, a room in a castle, or
whatever—wherever the party may encounter hostile entities is
where combat may take place. If the display would be marred by
drawing on it, the GM should use dice or some other form of marker
to record the locations of important details. Anything the players
would be able to see, touch, hear, or smell should be described to
them, because inventive players will scrape for any advantage they
can find, and are not above using a broken bottle, for example, as a
Thrown Weapon
if they can find one. The players need to feel as if they know all
the details of the encounter location they could know if they were
actually there. It is a sloppy GM who suddenly realizes he hasn't
told his players about the small window in the northern wall just as
the party is frantically scrambling to find an escape route.
See
rule 154.2 for the procedure
to determine whether surprise exists. Once the determination
has been made (this information should be conveyed to the
players only if they are the ones who have achieved surprise)
the GM then places the hostile figures on the display. If no
surprise exists, the distance between the two parties should
not be less than 8 hexes, and each group is aware of the
other. If surprise does exist, the distance between the groups
should not exceed 8 hexes, and can be much less depending on
the GM judging the degree of “jump” one group has on the
other. In both cases, the GM has the final say as to the
distance separating the groups.
If surprise does not exist, Initiative is determined normally
for the first Pulse of combat (see rule 19.2). If surprise
does exist, the party with the advantage receives one “free”
Pulse during which it can take any action it wishes without
the surprised group being able to react. After this free
Pulse, Initiative for the remainder of combat is determined
normally.
For
the characters, the GM should use the system detailed in rule 156.
For all hostile figures, he should make a quick estimate relating
all presumed activity they may have undertaken up to the instant of
combat. The GM may dispense with this procedure if he feels the
Fatigue loss would balance out or if he wishes to simply get on with
and resolve the
encounter. If he assigns penalties from one side, he must make a
judgment for the other; he should never treat one party differently
from another in this regard.
Assigning
hostile figures a high Fatigue loss is one method of balancing a
fight so the characters may be able to defeat a foe who, on the
surface, may appear vastly superior. This does wonders for party
morale.
The
order in which all actions are attempted in a Pulse is called the
combat sequence. This sequence should be adhered to by the players
and the referee as this will greatly speed play.
Each Pulse, the following events occur in order:
- Initiative is determined for all non-engaged figures.
- If any Melee or Close Combat is possible, the GM groups the
engaged figures into engagements, determines Initiative for
each engagement, and resolves combat for each engagement
separately prior to proceeding to the next engagement. Each
engaged figure may choose one action from the list of actions
allowed of engaged figures on the Action Summary
(see rule 22.7).
- The
side that won Initiative in Step 1 now has the option to take
action or let the other side take action. All actions of the
figures on one side must be resolved before any figures on the
opposing side may take action.
Note: It
is entirely possible for Ranged, Melee, or Close attacks to
occur in this step as non-engaged figures move and
attack. Each non-engaged figure may choose one action from the
list of actions allowed of non-engaged figures on the Action
Summary (see rule
22.7).
After these steps are performed, the Pulse is over and a new
one begins. Rule 152.3 has
guidelines for the speedy resolution of combat actions.
Each action listed in rule 20, and rule 21, takes one full Pulse
to accomplish unless the figure performing them has an
exceptional Agility (see rule 22.3), in which case two actions
may be combined. Magic may also alter the number of actions
taken in a Pulse.
Some actions which figures in combat may wish to attempt will
require more than one Pulse to complete. The following list is
intended as a guide for the GM to be able to judge how long an
attempted action will take to perform (remembering each Pulse
equals 5 seconds).
| Action |
Pulses |
Seconds> |
| Search for trap in specific place (e.g., door) |
4 |
20 |
| Attempt to remove trap |
rule 104.3 |
rule 104.3 |
| Quick search of 10' by 10' room for disguised objects |
3 |
15 |
| Sound wall (floor, ceiling) |
1 |
5 |
| Search 10' by 10' wall segment for concealed objects |
18 |
90 |
| Pick lock |
rule 104.2 |
rule 104.2 |
| Force lock |
3 |
15 |
| Spike door (per spike) |
2 |
10 |
| Light torch |
5 |
25 |
| Light lantern |
7 |
35 |
| Exchange wieldy item close to, or in, hand with another
being |
|
|
| 1-handed, 1 item |
4 |
20 |
| 1-handed, 2 items |
6 |
30 |
| 2-handed, 1 item |
2 |
10 |
| 2-handed, 2 items |
4 |
20 |
| Take off backpack |
5 |
25 |
| Remove item from backpack |
|
|
| On ground |
6 |
30 |
| On back |
8 |
40 |
| Store item in backpack |
3 |
15 |
| Mount horse |
1 |
5 |
| Dismount horse |
1 |
5 |
For the Alusia
campaign: See below for modified
initiative procedures.
To determine Initiative, the Leader for each side rolls D10. To the
result is added the Leader's (PC+Military Scientist Rank). The side
with the highest total has the Initiative for the Pulse (any ties
are re‑rolled). When it becomes that side's turn to take
action, it may choose to act first or last, as it desires. That
decision is made after all engaged actions have been taken.
If the Leader is involved in Melee or Close Combat, Stunned or
unconscious, or otherwise incapacitated, some other non-engaged figure
must roll for Initiative. Only his PC is added to the D10 roll for
Initiative. A non-leader may not add his Military Scientist Rank to
the roll.
The Leader for a party is appointed prior to an adventure. An
alternate (a “second”) may be designated, but this alternate may not
use his Military Scientist Rank, if any. If there is any doubt as to
who is the current leader of a party, the GM resolves the
dispute.
A
figure's Initiative Value is equal to his (modified AG+PC+Rank
with any prepared weapon). If the figure has no prepared weapon, it
is equal to his (modified AG+PC).
In
each engagement, the figure with the highest Initiative Value may
act either first or last, at his option. All others must act in
order of their Initiative Value, from highest to lowest.
If
a figure is Stunned, or has any rear hex toward his opponent, the
opponent automatically receives the Initiative. Every character,
non-player character, and monster should have Initiative
Values for all weapons or attack forms determined prior to the
adventure and recorded (for characters, on their Character Record).
For the Alusia
campaign: The Initiative procedure is replaced with
the following procedure:
- At the beginning of combat, each character rolls d10 and
adds their current Agility, their Perception, their Rank with
any prepared weapon, and 2 × their leader's Military
Scientist rank (if they have a leader and that leader has the
Military Scientist skill) (modified AG+PC+Weapon
Rank+2×MilSci Rank). This is their Initiative
Value for the entire Combat.
- If a character changes weapons, they will need to
recalculate Initiative.
- If a leader is incapacitated, everyone on that side loses
the Military Scientist bonus, if any. In that case,
Initiative will need to be recalculated for every character on
the affected side.
- If a character is Stunned, they automatically act last in
the turn order. If multiple characters are Stunned, the GM
may sort them by current Agility scores if they wish; however,
since a Stunned character can take no other action other than
recover from being Stunned
(see 26), this is
a bit of a moot point.
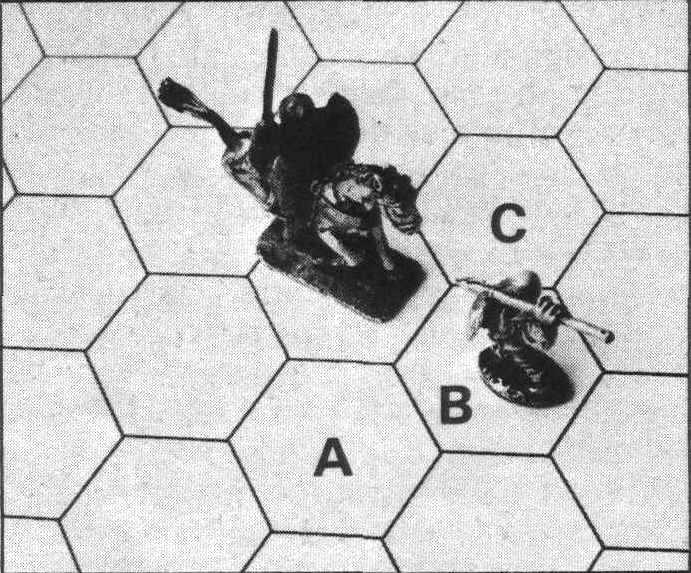
Further
judgment must be made by the GM as to the intent of each figure. For
purposes of determining Initiative Values, each figure should be
compared only to other figures who are involved in the same combat,
or who mutually mean each other harm (Illustration 3).
Engagements
are defined to allow swift, unambiguous resolution of combat
situations. The GM resolves each engagement's combat separately,
and deals with the individual engagements in any order he finds
convenient.
Thus,
if a figure chose to move during the last Pulse, it is assumed to be
moving for all purposes of determining combat modifiers, affects,
etc.
Being
engaged imposes certain limitations on the actions which a figure
may attempt. A figure who is engaged is defined as one who is
adjacent to a hostile figure on the display, and may have his
movement and choice of action restricted. The order in which the
actions of engaged figures are resolved is determined by each
figure's Initiative Value, and any actions taken by engaged
figures are not
simultaneous. Two or more
hostile figures who occupy the same hex are in Close Combat and are
considered engaged.
If
the figure who wishes to make the attack is within the defender's
Melee Zone, he may move only one hex within that Zone, and change
facing prior to attempting the attack. He may not move or change
facing after the attack.
If
the figure who wishes to attack is not within the defender's Melee
Zone he may move up to ½ of his TMR, either before or after
executing the attack. Any facing changes may be made only after the
attack.
If
the figure who wishes to Evade is within the defender's Melee
Zone, he may move only one hex within that Zone and change facing
one hex-side while executing the Evade.
If
the figure who wishes to Evade is not within the defender's Melee
Zone he may move up to ½ his TMR and change facing as he sees fit
(within the GM's discretion, see rule 21.1) while executing the
Evade.
If
a Melee attack is attempted on a figure who is Evading, with a
Ranked weapon, he may be able to Parry or Riposte (see rule 24.4).
Note:
A figure who is Evading receives defensive benefits versus Melee and
Ranged attacks (see rule 24.6).
If
the figure who wishes to Withdraw is within the opponent's Melee
Zone and the opponent also occupies at least one hex of the figure's
Melee Zone, the figure may Withdraw by backing directly into any of
his rear hexes but may not change facing.
While
Withdrawing, the figure may adopt one of two postures: Offensive
Withdrawal or Defensive Withdrawal. If he chooses the Offensive
Withdrawal posture, he may strike at his opponent (at −20% to
his Strike Chance) before executing the Withdrawal action. To adopt
a Defensive Withdrawal posture, a figure must have a prepared shield
(Ranked or Unranked). While in this posture, he may interpose the
shield between himself and any attack. This adds 20% to his Defense,
in addition to any other modifiers already in his favor.
If
the figure who wishes to Withdraw is within the opponent's Melee
Zone but the opponent does not occupy any hexes of the figure's
Melee Zone, he may move and change facing normally (see rule 21.1).
If
the opponent is able to Melee attack the figure, the opponent
automatically receives Initiative for the attack.
A
figure may Withdraw from one hostile figure's Melee Zone into
another hostile figure's Melee Zone. If the figure wishing to
Withdraw does not occupy a hex within the defender's Melee Zone,
he may move normally.
If
the figure wishing to Pass is within a hostile figure's Melee
Zone, he may move one hex within that Zone and change facing while
Passing.
If
the figure wishing to Pass is not within a hostile figure's Melee
Zone, he may move up to two hexes and change facing while Passing.
A
Pass action is a generic term for any non-attacking action a
figure may do. Typical Pass actions include: preparing an item;
preparing a weapon; putting an item or weapon away; picking up a
dropped weapon or item; mounting or dismounting a riding beast;
loading a missile; dropping to one knee or prone; rising up, etc.
All
of these actions are mutually exclusive; that is no two can be
attempted during the same Pass action.
If
the Adept wishing to cast a spell is within a hostile figure's
Melee Zone, he may not move or change facing, and, if attacked, will
have to perform a Concentration Check (see rule 45.5).
If
the Adept wishing to cast a spell is not within a hostile figure's
Melee Zone, he may change facing after the Cast Check is per-formed.
An Adept who is in Close Combat may not cast a spell, but may
activate Talent Magic (see rule 42).
If
the figure who wishes to Close and Grapple is within the Melee Zone
of the defender, the defender may attempt to Repulse the attacker's
Close attempt. If the defender wishes to Repulse, he rolls D10 and
compares the result to his Rank with any Prepared weapon. If the
result is less than or equal to his Rank, the attacker may not enter
the defender's hex and must cease all action for that Pulse. If
the result is above the Rank, the attacker may enter the defender's
hex and execute a Grapple attack immediately.
If
the figure who wishes to Close and Grapple is not within the Melee
Zone of the defender, the defender may not attempt to repulse the
Close attempt and the attacker may immediately enter and Grapple.
Figures that are larger than one hex treat this action differently
(see rule 29).
Note:
Any figure who enters Close Combat must immediately drop any
Prepared shield and any Prepared weapon not rated for Close
Combat.
A
Grapple is an attack in Close Combat against any figure who occupies
the same hex as the attacker. It is assumed any figures engaged in
Close Combat are rolling around on the ground, struggling with each
other. Grappling may only be attempted with a weapon rated for Close
Combat.
The
figure who wishes to Pass while in Close Combat may take any Pass
action he wishes (at the GM's discretion).
The
figure who wishes to Withdraw while in Close Combat must first
attempt to “break contact.” The figure rolls D10, and adds his
PS, and that of any other friendly figures in the hex, and subtracts
the total combined PS of any hostile figures in the hex. If the
modified result is 10 or above, the figure may Withdraw into any
adjacent hex and is assumed to be prone. In addition, an unmodified
roll of 10 always allows Withdrawal.
A
non-engaged figure is one who is not adjacent to any hostile
figure on the display. There are certain minor restrictions which
result from this, but non-engaged figures may generally take
any action they wish. All figures who are considered on the same
side or members of the same party take their actions together and in
any order they find convenient. In case of disagreement, the GM has
final say as to the order of actions. No actions are considered
simultaneous, and all actions of non-engaged figures occur
after all the actions of engaged figures have been resolved.
The
determination of which side acts first is resolved by the Initiative
die roll (see rule 19.2).
A
figure's TMR equals the number of hexes he may move In one Pulse,
and he expends one point of the TMR for each normal, unobstructed
hex he enters. For characters and all non-player characters,
this total is determined by their modified AG (see rule 5.6). For
monsters, it is listed with their other characteristics (see rule
134 through rule 144).
During
movement, a figure may change facing as it desires within the
judgment of the GM and the fellow players. Any complicated maneuver
the figure attempts may result in a penalty being applied by the GM
in the form of a reduction in the figure's TMR for that Pulse. For
instance, turning three hex-sides (180o)
within one move is a fairly complex maneuver. The GM may decide if
the figure wishes to change facing to that degree, it may move two
less hexes during the Pulse. At the end of movement, a figure must
unambiguously face one hex-side (in the case of multi-hex
monsters, one hex vertex).
The
TMR assumes a flat surface with little or no hindrance to movement.
The GM is allowed to assign a penalty for movement attempted over
terrain not conducive to quick traversal. In any case, a figure may
always (if not Stunned, etc.) move one hex during a Pulse, no matter
how difficult the terrain.
If
a figure enters the Melee Zone of any hostile figure, he must stop
movement but may change facing. If in the midst of executing a
Charge and Close action, he may then be able to enter the defender's
hex, depending on the results of the defender's Repulse attempt.
If
a figure wishes to jump during his movement, the GM may allow this
with a penalty of one hex for every 5 feet (or part thereof)
jumped (horizontally or vertically) and make the figure who jumped
attempt a roll versus his modified Agility (with an appropriate
difficulty factor) to see if he landed cleanly.
Often
two, or more, friendly figures will wish to pass through a hex at
the same time, or need to squeeze past another figure in the same
hex. The GM must judge whether circumstances will allow or prevent
the move, and if it is hindered, to what degree. Thus, a halfling
should be able to squeeze past a human without too much trouble, but
for one human to move through a hex containing another human will
result in at least a TMR penalty of two hexes, and possibly be
disallowed if the human is currently engaged in some fairly active
situation (such as preparing a bow to be fired).
A
figure may crawl at a rate of ¼ of his TMR (round down).
Note:
Giant characters have their TMR calculated according to the monster
section pertaining to them (see rule 138.1). The average TMR listed
is used as the midpoint of a chart the GM creates similar to the one
in rule 5.6, with the appropriate giant's TMR replacing the
average human TMR of 5, with modification above and below that
occurring in a similar manner according to modified Agility as for
humans.
Example:
A Cloud Giant with a modified Agility of 19 has a TMR of 14 (average
TMR of 13+1 for Agility=14).
At
the end of the figure's movement, if he is adjacent to any hostile
figure, he may Melee attack him (with a negative modifier; see rule
24.6). The destination hex is counted when figuring ½ of the TMR.
Consult
the Weapon Tables (see rule 27) for listings as to which weapons
are Pole weapons.
This
action is in all ways similar to rule 21.2, except the movement is
greater and using a Pole weapon gives the attacker a bonus to his
Strike Chance (see rule 24.6). Some Pole weapons use this attack
form from two hexes away (see the Weapon Tables, rule 27.2).
This
action is in all ways similar to rule 20.6, except the charging
figure has moved into the adjacent hex from outside that hex. No
facing changes are allowed during this action, and the destination
hex (the hex the defender occupies) is counted when figuring ½ of
the TMR.
The
figure must obey all rules of movement (see rule 21.1) and while
moving is much harder to hit (see rule 24.6).
If
a figure who is evading while moving is Melee attacked he may, if he
has a prepared Ranked weapon, be able to Parry or Riposte (see rule
24.4).
The
action functions in all respects as a Withdraw (see rule 20.3)
except the figure may not adopt an Offensive posture since there are
no adjacent hostile figures to attack.
A
figure may not move or change facing in the same Pulse as a weapon
is Fired or a spell is loosed, with two exceptions:
- Once
a cross-bow is prepared and loaded, a figure may carry it
around and fire whenever he wishes. In this instance, movement of
up to two hexes prior to, or after, firing is allowed.
- If
an Adept or his mount is flying and the Adept is in all other ways
eligible to cast a spell (has his hands free, is not out of
Fatigue, etc.) he or his mount may move up to ½ of his or his
mount's TMR (round down) and attempt to cast the spell prior to,
during, or after his movement. This also applies to all flying
magic-using monsters.
Only
targets who occupy one or more hexes of a figure's Ranged Zone may
have a Missile or Thrown Weapon Fired at them.
For the Alusia campaign: Modification
to 21.7, 22.3, Weapons
Table note G
Normally a missile weapon needs one Pass action to load and a
Fire action to fire, meaning it can only be fired once every
other turn on combat. However, if a character has Rank 3 or
higher with a missile weapon, or the character has a
modified AG of 26 or higher
(see 22.3), that
character may load in one fewer action, meaning:
- The character may load and fire most missile weapons in the
same action.
- The character may load a crossbow in one Pass action instead
of two.
- The character may load a crossbow using a crannequin in two
Pass actions instead of three.
Typical
Pass actions are listed in rule 20.4. A figure who is Passing may
also change facing while executing a Pass. The actions listed in
rule 19.1 may require a number of consecutive Pass actions to
complete.
22. Action Choice Restrictions
Normally
figures occupying the Tactical Display may only attempt one
permissible action per Pulse. Figures with a modified Agility of 8
or less are restricted in the amount of movement they may combine
with other actions. Figures with a modified Agility of 22 or above
gain extra movement and may be able to combine two actions in one
Pulse.
Figures
who become stunned or otherwise incapacitated will have their choice
of actions drastically curtailed. The type of attack a figure may
attempt against a hostile figure is limited by his position on the
display relative to the hostile figure and the degree of visibility
which exists.
The
use of magic in combat is subject to restrictions and may, in some
circumstances, be impossible.
The
actions may be combined in any order. If a figure with this option
chooses not to combine two actions, it may increase its movement
(see rule 22.2) by two hexes.
See
rule 26. for details concerning Stun and Stun recovery. A figure who
becomes incapacitated can do nothing until he recovers.
A
figure may only Melee attack a hostile figure he is adjacent to and
who occupies at least one hex of his Melee Zone. A figure may only
Grapple a hostile figure in the same hex. A figure may only Fire at
a hostile figure who occupies at least one hex of his Ranged Zone.
If
a figure is attempting to Melee attack a hostile figure who occupies
a hex which is obscured (due to smoke, magic, etc.), he may attempt
to strike if he first rolls less than or equal to his
Perception × 4.
If the roll is above this result, the attack may not take place and
the figure may take no other action that Pulse.
This
check may need to be done twice, once while Preparing the spell and
once before Loosing it. If either check results in the Adept's
concentration being broken, the spell may not be cast. No spell work
of any kind is allowed in Close Combat, but Talent Magic may be
activated at any time and does not require the expenditure of a Pass
action to do so.
This table lists all actions and their
restrictions.
| Actions Allowed of Engaged Figures |
| • Melee Attack |
| • Evade |
| • Withdraw |
| • Pass |
| • Prepare or Loose a Spell |
| • Close and Grapple |
| If in Close Combat… |
| • Grapple |
| • Withdraw |
| • Pass |
| Actions Allowed of Non-Engaged Figures |
| • Move up to full TMR |
| • Move up to ½ TMR and Melee Attack |
| • Move up to ½ TMR and Charge and Close |
| • Move up to ½ TMR and Evade |
| • Move up to full TMR and Charge with a Pole Weapon |
| • Retreat |
| • Fire |
| • Pass |
| • Prepare or Loose a Spell |
A
hostile figure may be attacked by Ranged, Melee, or Close Combat
while on the display. To attack via Ranged Combat, a figure must be
armed with a Prepared weapon rated for Ranged Combat and the target
must occupy at least one hex of the figure's Ranged Zone. To
attack via Melee Combat, the figure must be armed with a prepared
weapon rated for Melee Combat and the target must occupy at least
one hex of that figure's Melee Zone. To attack via Close Combat,
the figure must be armed with a prepared weapon rated for Close
Combat and share the same hex as the target.
Note: Empty bare hands are always considered a prepared weapon.
The
order of all attacking actions is determined by the Initiative
procedure as detailed in rule 19.2 and rule 19.3. Combat involving
engaged figures is always resolved prior to any combat involving
non-engaged figures. An attacker's weapon is always assumed
to be held in his Primary hand (see rule 6.2) unless he states
otherwise. Optionally, a figure may attempt to use two weapons at
once, or attempt to strike more than one target with one weapon.
Special
types of attacks are allowed, and these include attempting to Trip,
Entangle, Restrain, Knockout, Shield Rush, or Disarm.
The
attacker declares his target, determines and applies any Ranged
Combat modifiers (see rule 24.6), and executes a Strike Check. The
only weapons eligible for use in Ranged Combat are those rated for
Ranged Combat on the Weapon Tables (see rule 27.2).
To
fire a weapon, the attacker must have a Line of Fire (see rule 16)
to the target. In addition, the attacker may fire into but not
through an obscured hex. The weapon fired always travels in a
straight line, and if not stopped by striking an object, it will
travel 1.5 times the maximum range of the weapon, then fall to the
ground.
Whenever
a fired weapon enters a hex occupied by a figure (other than a solid
wall, tree, or pillar which automatically breaks the weapon), there
is a chance the weapon will hit the figure instead of continuing its
flight. The weapon's flight is always stopped when it strikes a
figure and remains in that figure until withdrawn.
A
Strike Check must be resolved for all figures occupying any hex
along the Line of Fire until the weapon hits something, or loses
momentum and falls to the ground.
A
figure may never check a Line of Fire without executing the Fire
action, whether or not the weapon is actually loosed.
The
attacker declares his target, applies any Melee Combat modifiers
(see rule 24.6), and executes a Strike Check. The only weapons
eligible for use in Melee Combat are those rated for Melee Combat on
the Weapon Tables. The attacker may have moved adjacent to the
target during that Pulse and this combination of movement and Melee
is a Charge (see rule 21.2).
The
normal melee attack is intended to do as much damage to the target
as possible, but other forms of specialized attack exist and are
detailed in rule 23.5.
The
attacker declares his target (there may be more than one figure in
the hex), applies any Close Combat modifiers (see rule 24.6), and
executes a Strike Check. The only weapons eligible for use in Close
Combat are those rated for Close Combat on the Weapon Tables. The
attacker may have moved into the target's hex during that Pulse,
and this combination of movement and Grappling is detailed in rule
20.6 and rule 21.4.
A
figure may attempt to strike one or more targets more than once as
part of the same attack with two different weapons (one in each
hand), but suffers a negative attack modifier (see rule 24.6). The
attacks need not be directed at the same hostile figure, but must be
of the same type (Grapple, Melee, or Fire). Some non-humanoid
monsters could attack three, four, or more times in one Pulse using
this option.
A
figure may attempt to strike more than one target one time each if
the prepared weapon is Class B and the attacker is Rank 4 or above
with the weapon. Each figure thus attacked must be in adjacent hexes
within the attacker's Melee Zone. Thus, the maximum number of
attacks available via this option is three. This attack may only
occur in Melee Combat, and the attacker suffers a negative attack
modifier (see rule 24.6).
[23.5] A figure attempting to attack may specify any one of the following
special attacks:
Trip:
The attacker must be armed with a quarterstaff, spear, halberd,
poleaxe, or glaive and be in Melee Combat. The Base Chance is 40%
and the Damage is D10. If the attack is successful, the target must
attempt to roll less than or equal to his (modified AG × 3).
If the target's Agility roll is successful, he keeps his footing;
if he fails the roll, he falls prone. This only works against human
size or smaller targets.
Entangle:
The attacker must be armed with a Net, Whip, or Bola. The Base
Chance is listed with the individual weapons. If entangled, the
target suffers D10−4 damage. If the attack is successful, the
target must attempt to roll less than or equal to his modified
Agility × 3,
falling prone if he fails. The target must disentangle himself
before rising, and to do so requires the target to execute a Pass
action for two consecutive Pulses.
Restrain:
A figure may attempt to restrain another figure by executing a
Grapple. A successful attack results in the hostile figure being
restrained (pinned). The Base Chance equals ((attacker's
PS+modified AG)-(target's PS+modified AG)) × 3.
No damage is done to the target. A restrained figure is treated as
incapacitated, and remains restrained until the hold is broken by an
attack from outside the hex which does at least one point of
effective damage to the restraining figure. Several figures may
combine their PS and AG to attempt to restrain a hostile figure.
Knockout:
The attacker must be armed with any weapon except Missile Weapons,
Entangling weapons, darts, grenades, lances, or pikes. The attack is
successful if the Strike Check result is equal to or less than 15%
of the modified Strike Chance. No damage is done and the target is
knocked unconscious for D10+5 minutes, with the results of the time
roll being kept from the players. This attack may not be attempted
on larger than human-sized monsters.
Note:
The sap is a weapon especially designed for this purpose and is
detailed on the Weapon Tables (see rule 27.2).
Shield Rush: The attacker
must be armed with any shield except a Main Gauche or Tower Shield.
The Base Chance is 40% and the Damage is D10−2. Rank with the
shield will increase the Base Chance, as with any weapon. If the
attack is successful, the target must attempt to roll less than or
equal to his (modified
AG × 3),
falling prone if he fails. If this attack is occurring at the
termination of a Charge attack, the Base Chance is increased by 20%.
Disarm:
The attacker must be armed with any weapon rated for Melee or Close
Combat. 20% is subtracted from the modified Strike Chance before the
attack is resolved. If the attack is successful, the target is
forced to drop one weapon or item of the attacker's choice and
also suffers 1 point of Endurance damage.
Every
weapon and attack form is assigned a Base Chance. This percentage
chance may be modified due to weapon skills, attack type, posture of
the combatants, defense of the target, etc. The Base chance with all
modifiers applied is the Modified Strike Chance. The attacker rolls
D100; if the result is less than or equal to the Modified Strike
Chance, the attack has been successful; above and the attack has
missed. Rolling a 99 may result in the weapon being broken and
rolling 100 may result in the weapon being dropped. Once a
successful hit has been made, a Damage Check is conducted.
If
the target is Evading, the attacker suffers a negative modifier to
his Strike Chance and, if he misses, his swing may have been
Parried, leading to a Disarm or Riposte.
To
attack with any Ranked weapon, the Strike Chance is equal to (Weapon
BC+modified MD+[4 × Rank]).
To attack with any unranked weapon, the Strike Chance is equal to
the unmodified Weapon BC. The Strike Chance of either a Ranked or
unranked attack will be further modified (see rule 24.6).
In
any natural attack form such as teeth, claws, etc., for monsters,
their (MD+[4 × Rank
(if any)]) is always added. For all characters and other figures,
the Strike Chance should be calculated prior to an adventure and
recorded on the Character Record.
If
the attacker rolls less than or equal to the Modified Strike Chance,
a successful hit has been scored and a Damage Check must be
performed (see rule 25).
Attack
types include Ranged, Melee, and Close Combat. Attack conditions
include lighting conditions, which hand the weapon is used in, and
other miscellaneous modifiers.
If
the roll is 99 the attacker may have broken the weapon; on 100 the
attacker may have dropped his weapon. In either case, the attacker
then rolls D100: if the roll is less than or equal to his (modified
MD × 3),
he has avoided either misfortune, otherwise the appropriate result
occurs.
A
dropped weapon may be picked up by any figure at any later time, but
a broken weapon may not be used. When this result occurs to an
attacker to whom it would not apply (a dragon's bite attack really
cannot be dropped), the GM may, at his discretion, announce the
attacker has fumbled and may not attack during the next Pulse due to
his clumsiness.
Only
figures who are currently Evading and are being Melee attacked may
Parry.
The
defender rolls D10, adds the Rank of any prepared weapon, and
subtracts the Rank of the attacker's weapon. If the result is 3 or
less, the attack has been successfully Parried, but in so doing, the
defender has been thrown off balance and must execute a Pass action
next Pulse. If the modified result is 4−7, the attacker has
been Disarmed per the attack of the same name (see rule 23.5). If
the modified result is 8 or above, the attack has been Parried to
the extent that the attacker has become Disarmed and the target may
execute a Melee attack instantaneously against him without any need
to perform an attack action. This is called a Riposte.
A
Riposte may never itself be Parried and may occur as many times
during a Pulse as the evading target was Melee attacked. A target
may even Parry attacks which do not come through his Melee Zone
(e.g., from behind him). An unarmed figure may Parry if he is Ranked
in Unarmed Combat (see rule 28).
A
figure's Defense Rating is subtracted from an attacker's Strike
Chance. The defense of a shield is a function of the Rank the target
has with the individual shield types (see the Shield Table).
If
the attack comes through any of the figure's rear hexes, the
addition of the shield defense is ignored, but the modification for
Agility remains in effect.
Optionally,
the shield defense may only be included for attacks which come
through the target's front hex and the hex facing the side of the
target in which the shield would actually be carried (normally in
the target's secondary hand).
The
Defense Rating is not subtracted from any attacks if the defending
figure is Stunned or incapacitated. Also, any shield defense is
ignored for Close Combat. Any shield except the Main Gauche is
automatically dropped upon entering into Close Combat.
The
characteristics for each shield are:
Weight:
The weight of the shield in pounds.
Defense
per Rank: The percentage by
which the figure's defense is increased per Rank while that shield
is prepared.
MD
Loss: The number of
points the figure's Manual Dexterity is reduced by, for all
purposes, while that shield is prepared.
Cost:
The cost in silver pennies for a shield of average
workmanship.
| Shield Type |
Weight |
Defense
per Rank |
MD
Loss |
Cost |
| Buckler |
3 |
2% |
- |
5 |
| Small Round |
5 |
3% |
−1 |
8 |
| Large Round |
10 |
4% |
−3 |
10 |
| Kite |
15 |
5% |
−4 |
15 |
| Tower |
25 |
6% |
−6 |
20 |
| Main-Gauche* |
1 |
2% |
- |
20 |
*The
Main Gauche does not subtract defense from any Fire attack, and
cannot make a Shield Rush attack (see rule 23.5). The Main Gauche
functions both as a weapon and a shield, and only one Experience
Point expenditure is used to rise in Rank in both, that of the
weapon (see rule 161.8).
Note:
When a shield is not prepared, it is considered slung on the back of
the figure carrying it. All shields except the Tower Shield are
constructed of wood and hides and do not affect the flow of mana in
regard to Adepts.
After
calculating the attacker's Strike Chance and subtracting the
defender's Defense, the Strike Chance Modifier Tables (see rule
24.8) should be consulted to see if any situations exist which could
further modify the Strike Chance.
See
the Strike Chance Modifier Tables (see rule 24.8) for these
listings. Although these listings may appear lengthy, few are used
often, and those will soon be committed to memory after a few Melee
Combats. The GM is encouraged to invent any other modifiers he sees
fit to add in any combat situation. He is the final arbiter as to
what modifiers are used and when they apply. Any situations not
specifically covered by these listings must be judged individually
by the GM.
Close Combat Modifiers
| Advantage |
For… |
| +1% |
Each point attacker's PS is greater than target's PS |
| +20% |
Target has 0 Fatigue Points
remaining |
| +20% |
Target is Stunned |
| Penalty |
For… |
| −1% |
Each point target's PS is greater than attacker's PS |
| −20% |
Attacker has 0 Fatigue Points remaining |
Melee Combat Modifiers
| Advantage |
For… |
| +10% |
Target has 0 Fatigue Points remaining |
| +15% |
Target being attacked through a Flank hex |
| +15% |
Target is Stunned |
| +20% |
Target is kneeling or prone |
| +20% |
Attacker is Charging with a Pole Weapon or Shield |
| +30% |
Target being attacked through a Rear hex |
| Penalty |
For… |
| −4% |
Each Rank the target has with prepared weapon if
Evading |
| −10% |
Target is currently Evading (in addition to above) |
| −10% |
Attacker has 0 Fatigue Points remaining |
| −15% |
Attacker is Charging with a non-Pole Weapon |
| −20% |
Attacker is Melee attacking while Withdrawing |
Ranged Combat Modifiers
| Advantage |
For… |
| +10% |
Target being attacked through a Flank hex |
| +10% |
Target is Stunned |
| +10% |
Attacker is kneeling |
| +20% |
Target being attacked through a Rear hex |
| Penalty |
For… |
| −3% |
Every hex through which a Thrown Weapon travels |
| −3% |
Each five hexes (or fraction) after the first five hexes
through which a Missile Weapon travels |
| −5% |
Target is currently moving |
| −10% |
Target is kneeling or prone |
| −20% |
Target is currently Evading |
| −20% |
Target occupies Sheltered hex |
Lighting Condition Modifiers
| Penalty |
For… |
| −10% |
Starry night or shadowy interior |
| −20% |
Cloudy night |
| −30% |
Cave or unlit interior |
| −40% |
Pitch blackness |
| −50% |
Target is invisible or similarly undetectable |
Miscellaneous Modifiers
| Penalty |
For… |
| −20% |
Striking weapon held in attacker's Secondary hand |
| −10% |
Multiple Strike; attack with weapon in Primary hand |
| −30% |
Multiple Strike; attack with weapon in Secondary hand |
| −10% |
Multiple Strike; attack with each weapon if
ambidextrous |
| −20% |
Multiple Strike with Class B two-handed weapon |
Note: Each modifier
is added to the Strike Chance of the attacker in each instance
where it applies. All modifications are cumulative.
Whenever
a figure is hit by a weapon or magic, a Damage Check is performed.
Each attack type has a damage modifier which is added to a D10 roll,
and the result is the amount of damage points inflicted on the
figure. Armor may absorb some or all of the damage up to the armor's
Protection Rating, and any damage points not absorbed are inflicted
on the figure and subtracted from either Fatigue or Endurance. Any
damage points actually inflicted on the figure (not absorbed by
armor) are termed Effective Damage.
There
are three types of damage possible from a successful strike,
depending on how low the attacker rolled on the Strike Check: Damage
affecting Fatigue; affecting Endurance; and Grievous Injury. When
the Strike Check result is above 15% of the Modified Strike Chance,
any effective damage is subtracted from Fatigue (Endurance
when Fatigue reaches zero). When the Strike Check is 15% or less of
the Modified Strike Chance, any damage directly affects Endurance
and is not absorbed by armor. If it is 5% or less of the Modified
Strike Chance, a Grievous Injury may also result, in addition to
Endurance damage. These percentages are summarized on the Special
Damage Chart (see rule 25.2).
Any
Damage Checks modified to a result less than 1 are treated as 1 (see
rule 2.7).
Each
type of armor has a Protection Rating, which indicates the amount of
damage points subtracted from every successful attack. When a
figure's Fatigue reaches 0, any further damage affecting Fatigue
is subtracted from Endurance in stead. However, a figure cannot lose
both Fatigue and Endurance as a result of a single Strike Check.
The
Armor Table lists all types of armor and their Protection Ratings.
The GM should feel free to invent other types of armor if he wishes.
The
characteristics for different armor types are:
Weight:
The number by which a figure's size is multiplied to find the
weight of the armor in pounds. Size numbers for the character races
are: Halfling (3); Dwarf 5 (4); Elf (5); Orc (5); Human (6); Giant
(15). For female figures, 0.5 should be subtracted from the
multiples.
Protection:
The number of Damage has his Points the armor absorbs.
AG
Loss: The number of
points the figure's Agility is reduced for all purposes when that
armor is worn. Does not include possible additional Agility loss for
the weight of the armor (see rule 156.9).
Cost:
The cost in silver pennies for the armor. Cost assumes average
workmanship and man-sized armor; larger or smaller armor
should cost proportionally more or less.
For the Alusia campaign: Scale the cost by the
following factor to get the cost for other races:
| Race |
Factor |
|---|
| Halfling |
0.5 |
| Dwarf |
0.66 |
| Elf |
0.83 |
| Orc |
0.83 |
| Giant |
2.5 |
The GM may adjust the cost (rounding off etc.) as he or he sees fit.
Stealth
Adjust: The amount by
which a figure wearing that type of armor has his Stealth percentage
adjusted.
| Armor Type |
Weight |
Protect |
AG
Loss |
Cost |
Stealth
Adjust |
Cloth Alone* (or
Heavy Furs, etc.) |
1 |
1 |
0 |
10 |
+5% |
| Leather |
3 |
4 |
−1 |
20 |
0 |
| Scale |
4 |
5 |
−3 |
100 |
−5% |
| Chainmail |
7 |
6 |
−2 |
200 |
−10% |
| Partial Plate |
6 |
6 |
−2 |
250 |
−15% |
| Full Plate |
8 |
7 |
−3 |
300 |
−20% |
| Improved Plate |
7 |
8 |
−3 |
350 |
−20% |
*Cloth armor is worn underneath all other armors and its protection
weight is factored into the weight.
The
Special Damage Table (see rule 25.6) lists modified Strike Chances
and their damage directly affecting Endurance range.
If
a possible Grievous Injury has resulted, the damage to Endurance is
first calculated and applied. The attacker then rolls D100 and
consults the Grievous Injury Table (see rule 25.7). If the roll
falls within the range specified for the class of weapon he is
attacking with, a Grievous Injury has resulted and the effects of
the resulting injury are applied to the unfortunate target
immediately. If the roll falls outside the indicated range, no
Grievous Injury occurs.
Weapons
are classed on the Weapon Tables (see rule 27.2) according to type:
thrusting weapons are Class A; slashing weapons are Class B; and
crushing weapons are Class C. The Grievous Injury Table lists the
ranges for each class of weapon. A figure may suffer any number of
Grievous Injuries in a Pulse.
Whenever
a figure suffers a Grievous Injury, there is a possibility he has
dropped whatever he is holding, and the procedure outlined in rule
24.3 is used to resolve this occurrence.
A
figure who suffers a Grievous Injury while wearing armor has the
Protection Rating of that suit of armor reduced by 2 until repaired.
Optionally, a figure who is also carrying a shield can choose to
have the shield cloven and spare his armor. A cloven shield is
useless.
Many
spells attack figures with purely magical energy, while others
inflict damage as a result of changes in the physical surroundings
of the target (windstorms, falling rocks, and the like). When purely
magical energy is involved, any damage is subtracted first from
Fatigue (Endurance only when Fatigue is exhausted), but is not
absorbed by armor. Other damage types, also subtracted from Fatigue,
are absorbed by armor.
When
being attacked by the breath weapon of a monster, treat the damage
as if magical energy, as above, but allow every target a Passive
resistance roll before applying the damage. If the target does
Passively resist, the damage is halved (round down). No Active
resistance is allowed versus breath attacks.
If
using this rule, add 1 to the damage modifier of a weapon for every
full 5 points of Physical Strength above the minimum necessary to
wield the weapon the attacker possesses.
Example:
A figure with a PS of 20 through 24 would do D10+5 damage when
wielding a broadsword.
However,
for every +1 of damage the figure receives, an extra 6% is added on
to the chance of the weapon breaking during combat.
Example:
The previous example figure with PS of 20 would have a chance to
break a broadsword on rolls of 93 through 99, inclusive.
This
increase in breakage chances precludes any Modified Strike Chances
which would conflict with it.
Example:
If the above figure had a Modified Strike Chance of 97%, it would
actually be 92% since rolls of 93–99 would result in a
possible break and 100 would result in a possible drop.
This
damage increase does not apply to Thrown or Missile Weapons.
If
wishing to allow increased damage for Rank attained with a weapon,
give a +1 bonus for every full 4 Ranks. This rule will
increase damage down by Thrown or Missile Weapons, and does not
increase breakage chances.
It
is recommended only one of these systems be used with any one
particular weapon, not both.
Modified
Strike
Chance |
Possible
Grievous
Injury |
Damage
Directly
Affecting
Endurance |
| 01–09 |
— |
01 |
| 10–16 |
01 |
01–02 |
| 17–23 |
01 |
01–03 |
| 24–28 |
01 |
01–04 |
| 29–36 |
01–02 |
01–05 |
| 37–43 |
01–02 |
01–06 |
| 44–49 |
01–02 |
01–07 |
| 50–56 |
01–03 |
01–08 |
| 57–63 |
01–03 |
01–09 |
| 64–69 |
01–03 |
01–10 |
| 70–76 |
01–04 |
01–11 |
| 77–83 |
01–04 |
01–12 |
| 84–89 |
01–04 |
01–13 |
| 90–96 |
01–05 |
01–14 |
| 97–103 |
01–05 |
01–15 |
| 104–109 |
01–05 |
01–16 |
| 110–116 |
01–06 |
01–17 |
| 117–123 |
01–06 |
01–18 |
| 124–129 |
01–06 |
01–19 |
| 130+ |
01–07 |
01–20 |
Note:
Though this table lists Modified Strike Chances greater than 100,
these are useful only in determining the range of Damage Affecting
Endurance and Possible Grievous Injuries. The highest possible
Strike Check is 100. A figure who rolls 99 must check to see if his
weapon has broken. A figure who roll 100 must check to see if he
dropped his weapon. Both checks are modified MD × 3,
or less, on D100.
Class A weapons inflict Grievous Injuries on
rolls of 01 through 20;
Class B weapons inflict Grievous Injuries on
rolls of 21 through 69;
Class C weapons inflict Grievous Injuries on
rolls of 70 through 100.
| D100 |
Grievous Injury Inflicted |
| 01–05 |
Congratulations! It's a
bleeder in your primary arm! Take 1 Damage Point from Endurance
and 1 per Pulse thereafter until the flow is staunched by a Rank
0 Healer or better, or you die. |
| 06–07 |
Oh no! Your opponent's
weapon has entered your secondary arm's elbow joint and the tip
has broken off. Take 2 Damage Points from Endurance and that arm
is useless until the sliver has been removed by a Rank 3 Healer
or better. Increase the chance of infection by 30%. |
| 08 |
A vicious puncture wound in
your groin! Take 3 Damage Points from Endurance and reduce your
TMR by 2 until fully recovered, which will take two months.
Increase the chance of infection by 30% (assuming you live long
enough for such things to matter). |
| 09–10 |
You have been stabbed in your
secondary arm. Drop whatever you were holding in it and take 2
Damage Points from Endurance. It will take a full week for the
arm to be of any use to you whatsoever. |
| 11 |
Your aorta is severed and you
are quite dead. Rest assured your companions will do their best
to console your widow(er). |
| 12 |
A stomach puncture. Nasty.
You suffer 3 Damage Points from Endurance and lose 2 from your
TMR until fully recovered, which will take two months. Also, you
are automatically Stunned for the next Pulse (if you aren't
already), after which you will recover. Increase the chance of
infection by 20%. |
| 13 |
Your opponent's weapon has
entered your eye; roll D10. On a roll of 1, the weapon has
entered your brain and you are dead. On a roll of 2–5, your
left eye is blinded; on a roll of 6–10, your right eye is
blinded. If you are lucky enough to be blinded instead of killed,
you suffer 2 Damage Points from Endurance. In addition, a figure
who is blind in one eye suffers the following subtractions: 2
from Physical Beauty; 4 from Perception; 1 from Manual Dexterity.
A figure blinded in one eye reduces his Base Chance with any
Missile or Thrown Weapon by 30%. |
| 14–18 |
A wound of the solid viscera.
Usually fatal. Take 3 Damage Points to Endurance and 1 per Pulse
thereafter until the bleeding is stopped by a Rank 2 Healer or
better, or you die. Increase the chance of infection by 30%. |
| 19–20 |
Take a stab in the leg (your
choice as to which one) resulting in a deep puncture of the thigh
muscle. Suffer 1 Damage Point to Endurance and reduce your TMR by
1 until you heal, which will take 4 weeks. |
| 21–25 |
A chest wound. Take 2 Damage
Points to Endurance and reduce your TMR by 1 until recovered
(about 2 months). Look on the bright side, though. Your
attacker's weapon is caught in your rib cage and has been
wrenched from his grasp. |
| 26–27 |
Bad luck! Your secondary hand
has been severed at the wrist. Take 2 Damage Points to Endurance
and subtract 1 point per Pulse from Fatigue thereafter (Endurance
when Fatigue is exhausted) until you are dead or the bleeding is
staunched by a Rank 0 Healer or better. If you live, reduce your
Manual Dexterity by 2. |
| 28–30 |
Worse luck! Your primary hand
has been severed. See result 26–27 for effects. |
| 31–34 |
A minor wound. Your face is
slashed open, ruining your boyish good looks and causing blood to
spurt into your eyes. Reduce your Physical Beauty by 4
permanently. |
| 35 |
Your secondary arm is sliced
off at the shoulder. Take 5 Damage Points from Endurance and
1 per Pulse thereafter from Fatigue (Endurance when Fatigue is
exhausted) until you are dead or the bleeding is staunched by a
Rank 1 Healer or better. Reduce your Manual Dexterity by 2 and
your Agility by 1. |
| 36 |
The same as 35, except it's
your good primary arm that has been lopped off. |
| 37–40 |
You have been eviscerated!
Take 4 Damage Points from Endurance and 1 point per Pulse from
Fatigue thereafter (Endurance when Fatigue is exhausted) until
you are unconscious. Increase your chance of infection by 40%. |
| 41–42 |
A glancing blow lays open
your scalp and severs one ear (your choice as to which one). Take
2 Damage Points from Endurance. Reduce your Perception by 2. |
| 43 |
A savage slash rips open your
cheek and jaw. Take an automatic Pass action next Pulse due to
the shock of the blow. Your Physical Beauty is increased by 1,
since your disfigurement will bring out the maternal/paternal
instincts in the opposite gender. |
| 44–50 |
A slash along one arm, and
it's a bleeder! Take 2 Damage Points from Endurance and lose 1
point from Fatigue (Endurance when Fatigue is exhausted) each
Pulse until the bleeding is stopped by a Rank 1 Healer or better,
or you die. |
| 51–52 |
Hamstrung! Roll D10. On a
roll of 1–4, it is your left leg. On a roll of 5–10,
it is your right. Take 4 Damage Points from Endurance and fall
prone. You may not stand unassisted until the wound is healed
(which should take three months). Reduce your Agility by 3
permanently. |
| 53–60 |
Your primary arm is crippled
by a wicked slash! Take 2 Damage Points to Endurance and drop
anything you have in your primary hand. The arm is unusable until
healed, which should take 2 months. |
| 61–67 |
Your secondary arm is
crippled; see 53–60 for details. |
| 68–69 |
A nasty slash in the region
of the shoulder and neck. Roll D10. On a roll of 1–3, your
head is severed and your corpse tumbles to the ground. On a roll
of 4–6, your secondary collar bone is crushed; on a roll of
7–10, your primary collar bone is crushed. If your collar
bone is crushed, the results are identical to 53–60, except
you suffer 4 Damage Points to Endurance. |
| 70–74 |
A crushing blow smashes your
helmet and causes a concussion. Take 3 Damage Points from
Endurance and suffer a reduction of 4 in both Manual Dexterity
and Agility lasting for 3 days. |
| 75–80 |
A massive chest wound
accompanied by broken ribs and crushed tissues. Very ugly, this.
Take 5 Damage Points immediately from Endurance. Reduce your
Manual Dexterity and Agility by 3 each until this wound heals
(should take about 4 months). Increase your chance of infection
by 10%. |
| 81–84 |
A crushing blow smashes
tissue and produces internal injuries. You suffer 2 Damage Points
from Endurance and 1 per Pulse thereafter to Fatigue (Endurance
when Fatigue is exhausted) until unconscious or you receive the
attention of a Rank 2 Healer or better. |
| 85–87 |
A jarring blow to your
primary shoulder inflicts 2 Damage Points to Endurance. Roll D10;
the result is the number of Pulses the arm is useless. You
immediately drop anything held in that hand. |
| 88–89 |
Similar to 85–87 except
it is your secondary shoulder. |
| 90–92 |
Your right hip is smashed
horribly. Take 5 Damage Points to Endurance and fall prone.
You will be unable to walk until the damage has healed (takes
about 6 months). Good fun. When healed, you will still have a
limp which will reduce your TMR by 1 and your Agility by 2. |
| 93–94 |
The same as 90–92
except it is your left hip that is smashed. |
| 95–97 |
Your opponent's weapon has
come crashing down on your head and fractured your skull. You
fall prone and are unconscious, and take 8 Damage Points to
Endurance. If you survive, you lose 2 from Agility, 2 from Manual
Dexterity, and 2 from Perception. It will take a year in bed to
recover. |
| 98–00 |
Crushing blow to your pelvis
breaks bone and tears tissue. Take 7 Damage Points to
Endurance and fall prone. Try to roll under your Willpower on
D100 to avoid falling unconscious. If
you survive, you will be unable to
move for D10 months. |
Note:
The suggested recovery times are a guideline for GMs to use in
determining how long characters should be kept out of action. The
actions of a competent Healer may alter these times in some
instances. These Grievous Injuries are designed for combat between
human-sized opponents. Any injuries sustained involving larger
monsters should be applied judiciously by the GM, taking into
account size and mass differences, etc. Simply stated, a halfling
would be hard put to drive his dagger into the eye of an elephant,
and in situations such as these, the GM may have to disallow the
Grievous Injury or change its effects. Any damage which results from
a Grievous Injury is in addition to the Endurance damage already
determined.
The
ultimate result of incurring damage for any figure is death; this
arrives when the figure's Endurance reaches 0. When a figure's
Endurance reaches 3, he falls unconscious, and can only be revived
by time or the arts of a Healer.
Whenever
a figure suffers effective damage greater than (EN÷3), rounded up,
from a single strike, he becomes Stunned. The figure may not take
any other action except attempt to recover from Stun until he has
recovered.
A
figure who becomes Stunned may drop anything he is holding. The
procedure outlined in rule 24.3 is used to resolve the outcome. The
check is only performed once, at the moment the figure becomes
Stunned.
A
Stunned figure who is currently engaged automatically has the lowest
Initiative Value of the engagement. Likewise, an unengaged Stunned
figure acts last among all of his fellows.
To
recover from being Stunned, a figure must roll less than or equal to
his ([WP × 2]+current
FT*).
*Current
FT is the figure's Fatigue total at the instant the roll is
made.
Every Pulse after becoming
Stunned, the figure may attempt to recover but may do nothing else,
including move.
Note:
Certain monsters begin with an Endurance of 5 or less. These
monsters never become unconscious; they are either alive and alert,
Stunned, or dead.
Any
instrument used to inflict damage on a figure is called a weapon.
Weapons may include the figure's hands, claws, talons, feet,
teeth, breath weapon, etc. All normal weapons are listed on the
Weapon Tables along with their characteristics. The only limits to
the number of weapons a character may have in his possession are the
weight and bulk of those weapons. The GM should carefully examine
each character, checking for the location of the character's
weapons. Any odd or unlikely method of carting weaponry around
should be disallowed. Any humanoid figure may never have more than
two one-handed weapons or one two-handed weapon prepared
at any one time. Carrying a prepared shield replaces one one-handed
weapon and disallows a two-handed weapon for this purpose.
Figures with more than two appendages may use as many weapons as
they are able. It is always assumed when a figure is armed with a
one-handed weapon it is carried in his primary hand, unless
stated otherwise.
A
figure may attempt to envenom any Class A or B weapon and thus
poison the figure it strikes. An Assassin is trained in the use of
envenomed weapons (see rule 27.3).
A
figure may attempt to strike barehanded (see rule 28.), but only if
one hand is free. Any figure may attempt to use an item not normally
assumed to be a weapon (furniture, books, glasses, dishes, etc.) at
the GM's discretion, who assigns Base Chance, damage modifiers,
and so forth.
All
normal weapons which would appear within a typical DragonQuest world
are detailed in the Weapon Tables. If the GM wishes to add more
exotic weapons to the list, he should feel free to, and should
assign characteristics for those weapons based on the examples
given.
The
characteristics for each weapon are:
Weight:
The weight of the weapon in pounds (or ounces, if so noted).
PS
(Physical Strength):
The minimum PS a figure needs to wield the weapon properly. A figure
without the PS to meet this minimum inflicts 1 less point of
damage for each point of PS he is below the required minimum. A
figure may never achieve Rank in a weapon he does not have the PS to
wield.
MD
(Manual Dexterity): The minimum modified MD a figure needs to
maneuver the weapon properly. A figure without the MD to meet this
minimum has the weapon BC modified by −5% for every point he
is below the minimum. A figure may never achieve Rank in a weapon he
does not normally have the MD to wield normally.
BC
(Base Chance): The
basic unadjusted chance of the wielder to score a successful hit on
an opponent with that weapon.
DM
(Damage Modifier): The modifier added to the D10 die roll when
performing a Damage Check. The modified damage total may never be
reduced to less than 1 due to this modifier (see rule 2.7).
Range:
The distance, in hexes, the weapon may be fired or thrown. P means
prohibited (i.e., weapon cannot be fired or thrown).
Class:
A letter representing the
type of damage done by the weapon. Class A weapons inflict thrusting
damage. Class B weapons inflict slashing damage. Class C weapons
inflict crushing damage. Used for determining Grievous Injuries (see
rule 25.7).
Use:
A letter representing the type(s) of attack the weapon may be used
in. R indicates Ranged Combat. M indicates Melee Combat. C indicates
Close Combat. A weapon may not be used in an attack type for which
it is not rated.
Cost:
The cost, in silver pennies, to purchase the weapon. At the cost
listed, the weapon is of normal quality.
Max.
Rank:
The highest Rank attainable with that weapon.
Swords
| Type |
Weight |
PS |
MD |
BC |
DM |
Range |
Class |
Use |
Cost |
Max.
Rank |
| Basilard |
24 oz |
10 |
10 |
40 |
+1 |
P |
A |
MC |
20 |
6 |
| Broadsword |
3 |
15 |
15 |
55 |
+4 |
P |
B |
M |
50 |
6 |
| Claymore (1–2) |
5 |
16 |
13 |
50 |
+4 |
P |
B |
M |
80 |
7 |
| Cutlass |
5 |
16 |
12 |
50 |
+3 |
P |
B |
M |
40 |
7 |
| Dagger A |
10 oz |
7 |
10 |
40 |
D |
8 |
A |
RMC |
10 |
9 |
| Dirk |
2 |
11 |
13 |
45 |
+2 |
P |
A |
M |
25 |
5 |
| Estoc |
2 |
15 |
17 |
45 |
+5 |
P |
A |
M |
65 |
9 |
| Falchion |
4 |
12 |
11 |
50 |
+2 |
P |
B |
M |
35 |
8 |
| Flamberge(1–2) |
6 |
16 |
15 |
50 |
+5 |
P |
B |
M |
90 |
6 |
| Knife |
1 |
8 |
10 |
40 |
+1 |
12 |
B |
RMC |
15 |
9 |
| Hand-and-a-Half(1–2) |
6 |
17 |
16 |
60 |
+5 |
P |
B |
M |
85 |
7 |
| Longsword (A) I |
3 |
14 |
16 |
45 |
+4 |
P |
A |
M |
75 |
8 |
| Longsword (B) I |
|
|
|
55 |
+3 |
P |
B |
M |
|
|
| Machete |
3 |
12 |
13 |
50 |
+2 |
P |
B |
M |
35 |
6 |
| Main-Gauche |
1 |
8 |
15 |
45 |
+1 |
P |
A |
MC |
20 |
10 |
| Poignard |
1 |
9 |
14 |
45 |
+1 |
P |
A |
M |
15 |
9 |
| Rapier |
2 |
11 |
18 |
45 |
+3 |
P |
A |
M |
35 |
10 |
| Sabre |
3 |
14 |
15 |
60 |
+3 |
P |
B |
M |
40 |
7 |
| Schiavone (1–2) |
3 |
15 |
12 |
50 |
+3 |
P |
B |
M |
70 |
7 |
| Schlaeger |
3 |
14 |
17 |
55 |
+3 |
P |
B |
M |
80 |
8 |
| Scimitar |
4 |
11 |
15 |
50 |
+3 |
P |
B |
M |
60 |
8 |
| Short Sword |
2 |
10 |
12 |
45 |
+3 |
P |
A |
M |
40 |
6 |
| Tulwar |
4 |
13 |
15 |
50 |
+4 |
P |
B |
M |
65 |
8 |
| Two-Handed Sword (2) |
9 |
22 |
14 |
55 |
+7 |
P |
B |
M |
100 |
5 |
Hafted Weapons
| Type |
Weight |
PS |
MD |
BC |
DM |
Range |
Class |
Use |
Cost |
Max.
Rank |
| Battle Axe (1–2) |
5 |
14 |
14 |
60 |
+4 |
6 |
B |
RM |
20 |
7 |
| Crude Club |
4 |
16 |
10 |
45 |
+2 |
6 |
C |
RM |
3 |
2 |
| Flail |
4 |
14 |
15 |
50 |
+2 |
P |
C |
M |
15 |
5 |
| Giant Axe |
25 |
29 |
12 |
65 |
+10 |
6 |
B |
RM |
50 |
7 |
| Giant Club |
10 |
25 |
9 |
50 |
+8 |
9 |
C |
RM |
10 |
5 |
| Giant Mace |
25 |
27 |
10 |
50 |
+7 |
8 |
C |
RM |
40 |
5 |
| Great Axe (2) |
6 |
19 |
17 |
65 |
+6 |
P |
B |
M |
30 |
7 |
| Hand Axe |
2 |
8 |
11 |
40 |
+1 |
8 |
B |
RMC |
15 |
4 |
| Mace |
5 |
16 |
9 |
50 |
+4 |
5 |
C |
RM |
15 |
5 |
| Mattock (2) |
6 |
19 |
14 |
55 |
+6 |
P |
C |
M |
18 |
5 |
| Morningstar (1–2) |
5 |
18 |
15 |
60 |
+4 |
P |
C |
M |
20 |
5 |
| Quarterstaff (2) |
3 |
12 |
16 |
55 |
+2 |
P |
C |
M |
3 |
9 |
| Sap C |
1 |
9 |
11 |
40 |
+1 |
P |
C |
MC |
2 |
3 |
| Sickle |
2 |
11 |
14 |
45 |
+1 |
P |
B |
M |
8 |
5 |
| Scythe
(2) |
8 |
16 |
15 |
50 |
+4 |
P |
B |
M |
14 |
4 |
| Torch B |
3 |
8 |
12 |
40 |
+1 |
P |
C |
M |
1 |
- |
| Truncheon |
3 |
15 |
14 |
50 |
+3 |
P |
C |
M |
30 |
5 |
| War Club |
3 |
14 |
10 |
50 |
+2 |
7 |
C |
RM |
5 |
5 |
| War Hammer |
4 |
15 |
13 |
45 |
+3 |
6 |
C |
RM |
14 |
5 |
| War Pick (1–2) |
5 |
17 |
13 |
45 |
+4 |
P |
C |
M |
20 |
5 |
Thrown Weapons
| Type |
Weight |
PS |
MD |
BC |
DM |
Range |
Class |
Use |
Cost |
Max.
Rank |
| Throwing Dart H |
3 oz |
9 |
15 |
40 |
D |
12 |
A |
R |
1 |
10 |
| Boomerang J |
1 |
11 |
15 |
40 |
D |
20 |
C |
R |
2 |
7 |
| Grenado K |
2 |
9 |
15 |
40 |
V |
15 |
- |
R |
V |
4 |
The following weapons also
function as Thrown Weapons: dagger, hand axe, battle axe, giant axe,
crude club, war club, giant club, mace, war hammer, javelin, spear,
giant spear, net, bola, and rock.
Weapons
are normally wielded one-handed, and the exceptions are noted
with a (2)
after the name of the weapon. Some may be used either one or
two-handed, and these are noted with a (1–2).
When weapons of this type are wielded two-handed, modify their
base DM by +1.
- indicates that a weapon has no Class for purposes
of Grievous Injuries; when a possible Grievous Injury is rolled,
only damage affecting Endurance results. V indicates that the
characteristic is variable.
*The damage done by a blowgun dart
depends upon the substance which coats the tip (poison, for
instance; see rule 93.8 and rule 27.3).
Pole Weapons
| Type |
Weight |
PS |
MD |
BC |
DM |
Range |
Class |
Use |
Cost |
Max.
Rank |
| Javelin D |
3 |
12 |
15 |
45 |
+2 |
12 |
A |
RM |
4 |
10 |
| Spear (1–2) |
5 |
15 |
14 |
50 |
+3 |
6 |
A |
RM |
10 |
5 |
| Giant Spear (1–2) |
15 |
22 |
16 |
55 |
+7 |
12 |
A |
RM |
20 |
5 |
| Pike (2)
E |
8 |
18 |
16 |
45 |
+5 |
P |
A |
M |
15 |
5 |
| Lance F |
7 |
16 |
18 |
45 |
+6 |
P |
A |
M |
4 |
5 |
| Halberd (2) |
6 |
16 |
16 |
55 |
+3 |
P |
B |
M |
15 |
5 |
| Poleaxe (2) |
6 |
18 |
15 |
55 |
+4 |
P |
B |
M |
20 |
5 |
| Trident (1–2) |
5 |
14 |
16 |
45 |
+2 |
5 |
A |
M |
8 |
5 |
| Glaive (2) |
7 |
16 |
18 |
55 |
+5 |
P |
B |
M |
15 |
9 |
| Giant Glaive (2) |
14 |
22 |
18 |
65 |
+9 |
P |
B |
M |
30 |
9 |
Missile Weapons
| Type |
Weight |
PS |
MD |
BC |
DM |
Range |
Class |
Use |
Cost |
Max.
Rank |
| Sling (2) G |
1 |
7 |
15 |
40 |
+1 |
60 |
C |
R |
1 |
8 |
| Short Bow (2) G |
4 |
14 |
15 |
45 |
+2 |
60 |
A |
R |
20 |
8 |
| Long Bow (2) G |
6 |
16 |
15 |
55 |
+4 |
180 |
A |
R |
25 |
8 |
| Composite Bow (2) G |
8 |
17 |
15 |
55 |
+4 |
225 |
A |
R |
30 |
8 |
| Giant Bow (2) G |
14 |
25 |
17 |
55 |
+7 |
45 |
A |
R |
80 |
8 |
| Crossbow (2) G |
7 |
18 |
14 |
60 |
+3 |
80 |
A |
R |
15 |
5 |
|
Heavy Crossbow (2) G |
10 |
20 |
14 |
60 |
+4 |
90 |
A |
R |
20 |
5 |
| Spear Thrower (2) G |
4 |
11 |
14 |
50 |
+2 |
15 |
A |
R |
5 |
10 |
|
Blowgun (2) G |
1 |
7 |
16 |
30 |
* |
7 |
- |
R |
3 |
10 |
Entangling Weapons
| Type |
Weight |
PS |
MD |
BC |
DM |
Range |
Class |
Use |
Cost |
Max.
Rank |
| Net L |
2 |
11 |
16 |
30 |
−5 |
5 |
- |
RMC |
4 |
4 |
| Bola M |
2 |
11 |
15 |
35 |
−3 |
10 |
- |
RC |
5 |
6 |
| Whip N |
3 |
10 |
16 |
40 |
−3 |
P |
- |
MC |
6 |
10 |
Special Weapons
| Type |
Weight |
PS |
MD |
BC |
DM |
Range |
Class |
Use |
Cost |
Max.
Rank |
| Rock |
V |
5 |
10 |
30 |
−1 |
8 |
C |
RMC |
- |
6 |
| Cestus O |
3 |
12 |
14 |
35 |
−1 |
P |
C |
MC |
15 |
9 |
|
Garrote
(2) P |
1 |
12 |
15 |
30 |
+3 |
P |
- |
C |
3 |
3 |
| Shield |
V |
10 |
12 |
40 |
−2 |
P |
C |
M |
V |
4 |
Weapon Accessories
| Type |
Weight |
No. |
Cost |
Notes |
| Shot |
4 |
20 |
1 |
Use in Sling |
| Dart |
2 |
20 |
5 |
Use in Blowgun |
| Arrows |
2 |
20 |
10 |
Use in any draw bows |
| Quarrels |
7 |
20 |
15 |
Use in any crossbows |
| Cranequin (2) |
3 |
1 |
10 |
Use to cock crossbows; requires PS 11 and two free hands |
All shot, darts, arrows, and quarrels come in appropriate
pouches or quivers of 20, and the weight and cost of the pouch
or quiver is included in the information given for the
accessory.
A.
When attacking a foe with a modified AG between 9 and 12 (inclusive)
the dagger may be used to attack 2 times per Pulse without penalty
against that foe. If the foe's modified Agility is 8 or less, the
dagger may attack 3 times per Pulse against that foe.
B.
A torch is not actually a weapon, but may be used as such in
emergencies. Also, brandishing a burning torch in the face of an
animal may cause it to flee. Any animal with a WP of 10 or less may
be scared off if it fails a WP × 4
roll. A successful result indicates the animal is not impressed. No
Rank may ever be achieved with a torch.
C.
The sap may only be used to knock out targets wearing only leather,
cloth, or no armor. Used by an Assassin,
any hit knocks out the target; for anyone else, any hit Stuns, and 4
or more points of effective damage knocks out the target (exception
to rule 23.5).
D.
A javelin functions as a Thrown Weapon unless it is launched by a
spear thrower, in which case the spear thrower's characteristics
are used and it functions as a Missile Weapon.
E.
A pike may be used to Melee attack any figure within two hexes; its
Melee Zone extends into what would normally be the first hexes of
that figure's Ranged Zone.
F.
A lance may be used only by a mounted figure.
G.
All Missile Weapons must be loaded before firing; this action is in
addition to Preparing the weapon itself. A Pass action must be taken
in order to load the sling, any draw bow, the spear thrower, and the
blowgun. Two consecutive Pass actions must be taken to load a
crossbow (three if using a cranequin).
H.
Up to three darts may be thrown at one, two, or three targets in one
Pulse with no penalty.
I.
The longsword is a narrow, pointed, two-edged sword which can
be used either to thrust (A) or to slash (B), therefore it has two
BCs and two DMs. A character employing a longsword must declare
which style of attack he is employing before beginning his
attack.
J.
A boomerang returns to the thrower if it did not hit anything during
its flight.
K.
A grenado is filled with any substance (manufactured by an
Alchemist) designed to burst into flames on impact. These substances
include Greek Fire, methane, and anything else the GM will allow. It
bursts on landing (it need not be thrown at a particular figure),
and its effects are determined by the substance contained within. If
a “miss” is rolled for the Strike Check, the GM should randomly
determine whether the grenado landed short, long, left, or right of
the target (or any combination thereof).
L.
The net may be used to Entangle in either Melee or Ranged Combat. In
Close Combat, it functions as a garrote, using a garrote's
characteristics.
M.
The bola may be used to Entangle only in Ranged Combat. In Close
Combat, it functions as a garrote.
N.
The whip may be used to Entangle and do damage in the same Pulse to
the same target in Melee Combat. In Close Combat, it functions as a
garrote. Once the target is Entangled, the attacker may choose to
leave him Entangled (thus letting go of the whip), or disentangle
the target, and retain possession of the weapon.
O.
Cesti are worn on the hands and need not be prepared in order to be
used.
P. The garrote is used to strangle the target and may only
be used against man-sized or smaller victims. When used by a trained
Assassin, once a successful hit has been scored, it will continue to
do damage every Pulse from then on until the victim is dead or the
Assassin has taken effective damage from either the victim or an
outside source. If the victim's PS is greater than the Assassin's,
the GM may permit him to attempt to break the hold, similar to the
attempt to Restrain (see rule 23.5). If the
attempt is successful, the hold is broken and the Assassin will have
to make another successful Strike Check to continue the
strangulation. Some types of plate armor may, at the GM's
discretion, prevent the successful use of this weapon due to
protection around the neck area. A non-Assassin has to roll a Strike
Check every Pulse to see if any damage can be done.
If
the GM permits, figures may carry and use weapons coated with
poison. Only Class A and B weapons may be envenomed. See the
Alchemist skill for details concerning types of poisons and
paralyzants. For the
venom to be introduced into the bloodstream of the victim, at least
1 point of effective damage must be inflicted.
When
anyone but an Assassin handles an envenomed weapon, there is a
chance the figure will nick himself and introduce the venom into his
own bloodstream. Every time an envenomed weapon is handled, the
figure must try to roll less than or equal to his (modified MD
× 3)
to avoid any mishap. If the roll is failed, he has been nicked by
the weapon and has poisoned himself.
Handling
a weapon is defined as including all actions of coating the weapon
with the venom, storing the weapon until used, and preparing
the weapon for an attack. The check should be made once for the
preparation of the weapon and once for the attack. The timing of the
checks is up to the GM, but at least two rolls should always be made
if the weapon is used to attack.
Cleansing
the weapon of the poison does not require a check. An envenomed
weapon will remain effective for 6 hours, by which time the venom
will have evaporated or been otherwise wiped off. When the weapon
has successfully struck and inflicted at least 1 point of effective
damage, the venom has been removed.
A
paralyzant functions as a knockout drug against human-sized or
smaller figures. If the victim fails his Willpower Check (see rule
93.8), he falls prone, unconscious, and will remain that way for
(20+D10-WP) minutes.
Whenever
a figure suffers effective damage from a Class A Missile or Thrown
Weapon, it has lodged itself in the target's body and reduces his
Agility by 3. The weapon remains lodged until a Pass action is
executed to remove it. When any barbed weapon is removed (arrow,
spear, etc.), the figure takes D10−4 damage directly to
Fatigue (not absorbed by armor). If the weapon is a Pole weapon, the
Agility loss is 5 and the damage to remove it is D10−2.
The
Agility loss applies only to man-sized or smaller figures. The
GM must judge the Agility loss for larger figures.
Any
figure may attempt to attack a hostile figure by using his hands and
feet. For many monsters, this is the only way they may attack.
Unless specified otherwise, all figures/monsters receive one attack
with their hands/claws/bite per Pulse without penalty. Some monsters
may be able to attack more than once, and these attacks are detailed
in the Monsters description (see section IX.).
For
a humanoid figure to strike with his primary hand, the Unarmed
Combat BC is (modified
AG × 2).
For every point the
figure's PS is above 15, the Unarmed Combat BC is modified by +1.
The damage done by a successful strike is D10−4, +1 Damage
Point for every 3 full points of PS above 15. A humanoid can achieve
Rank with bare hands just as he can with any weapon.
Beginning
at Rank 3 in Unarmed Combat, figures may choose to kick instead of
using hands (or in addition to hands) in unarmed attack. This allows
an unarmed attack while a figure's hands are full. The BC and
damage are as above. Using legs in this manner allows an attempted
Trip by the attacker (see rule 23.5) with BC and damage remaining
the same as for all Unarmed Combat.
Many monsters detailed in the Monsters Section
(see section IX) will
occupy more than one hex on the Tactical Display. Their size
necessitates the following alterations in the resolution of
both movement and combat.
Multi-hex
monsters have three types of hexes surrounding them: Front, Rear,
and Flank. Front and Rear hexes function in the same way for them as
for any other figure, but attacks through Flank hex-sides give
the attacker a bonus (see rule 24.6). The exact configuration of
Front, Rear, and Flank hexes vary with the size of the monster (see
Illustrations 4 through 7 below).
A
multi-hex monster is always placed on the display such that
its head unambiguously faces a vertex of two hex-sides. It may
move in any way so that its head enters any Front hex, and may move
up to its full TMR in this fashion. At the end of its movement, it
must once again unambiguously face a vertex. For facing changes, a
penalty of one less hex of movement for each two hex vertices
changed is applied, since the mass being maneuvered is much greater
than a humanoid's.
In
order to change facing, the monster must pivot using its head as the
pivot point. A multi-hex
monster may freely pivot or move into any hex occupied by a 1-hex
figure. The smaller figure is automatically knocked prone and the
monster may then attempt to trample the figure at a Base Chance of
40%, doing damage equal to D10+the size of the monster in hexes.
Trampling is Class C damage.
In
mounted combat, the TMR of the figure (comprising the mount and the
rider) is that of the mount; the rider may not move at all. A rider
may only mount or dismount when the mount is not moving. Any action
a figure is capable of while standing on the ground he is capable of
while mounted with the following exceptions:
- Using a two-handed weapon.
- Firing any missile or Thrown Weapon while
moving.
- Using more than one weapon at a time.
These
restrictions are lifted depending on the Horsemanship Rank of the
rider (see rule 157.2). A figure may always use a shield and a
one-handed weapon while mounted.
A
rider and mount will normally occupy only one hex, unless the mount
is a multi-hex monster. If they occupy more than one hex, the
movement will be governed by the rules of multi-hex monsters
(see rule 29.). On a normal mount, the rider will not be able to
attack out of his Front hex, only the hexes to either side of that
hex. His Front hex may be
attacked into using a spear (or similar long hafted weapon) or any
Fired weapon (see Illustration 8).
To
control a mount during combat, the Horsemanship skill of the rider
is taken into account. An inexperienced horseman will have an
incredibly difficult time even con-trolling his mount in a
chaotic melee; it will be better for him to dismount and fight on
foot until he becomes skilled.
A
Charge on a mount is executed in the same manner as a Charge on
foot, except the amount of movement prior to the attack will be
greater and the Charge must be in a straight line (no facing changes
allowed). Any act of turning the mount or stopping it during or
after the Charge will require a Horsemanship Check (see rule 156.2).
The Pulse following any mounted Charge, the momentum will take the
mount past the target to its full TMR. Any attempt to turn or stop
the mount will occur after that movement is terminated. A failed
check will result in the mount continuing on its way.
At
the end of every combat in which a figure is wounded, or when a
figure is wounded in a non-combat situation, there is the
possibility that figure has become infected as a result of their
wound. An Infection Check is performed to determine whether the
figure is infected or not.
The
Base Chance of infection is 10%. If the figure took any damage to
Endurance, add 20%+the amount of Endurance damage taken to the Base
Chance of infection. If a bite, claws, or talons inflicted the
damage, add an extra 20%. Specific Grievous Injuries can raise the
Base Chance of infection even further. The infected figure rolls
D100. If the result is equal to or less than the modified Base
Chance of infection, the figure is infected.
An
infected figure is considered diseased, and every morning after
becoming infected, the figure must try to heal himself or suffer
Endurance damage. To heal himself, a figure must roll under his
original unmodified Endurance on D100; a roll equal to or less than
the Endurance results in a cure. If the infection is not cured, each
day the figure takes D10−5 points of Endurance damage from the
infection. Obviously, an infected figure who is not cured will
eventually die from his wounds. The effects of slow acting (blood
agent) poisons function in the same manner as infections except
there is no roll for cure.
The
following is an example of the way a typical combat will be
resolved, emphasizing order of resolution rather than detailing the
actual die rolls and success chances.
A party of player characters is
traveling by foot along a path deep within a forest. They are alert
but not combat-ready; they are tired from having traveled long
and hard all day. The party consists of Ariella, a human Celestial
Mage, Eaglewing, an elven Ranger; and, Delion, an elven Illusionist.
The GM has generated an ambush for the party as they round the next
bend in the path, and assigns a readiness factor (see rule 154.2) of
3 to their chance to detect the ambush.
Eaglewing is leading the party,
so his Perception of 10 is used for the check, but he also receives
a 15% bonus due to his Ranger skill. Eaglewing does detect the
ambush, and the hobgoblin, orc, and goblin lying in wait will get no
surprise this day. The GM determines they will attempt an attack
anyway, and combat begins.
The GM draws out the
surroundings, places the characters' miniatures on the Display,
and then places the monsters' figures. He determines the
characters' Fatigue loss (due to their long march), and
adjudicates the monster's Fatigue status. He allows the characters
to prepare a weapon, if they wish, because of the alertness of
Eaglewing.
First Pulse:
The hobgoblin (Perception 13) is the Leader of the monsters.
Eaglewing is the character party's Leader. The GM rolls Initiative
for the monsters, and Eaglewing's player rolls for the party. The
hobgoblin wins and decides that the monsters will act first. The
hobgoblin tries to goad his mount (a horse) to Charge Eaglewing. The
GM rolls the hobgoblin's Horsemanship check—it is successful—and
the charge occurs. The hobgoblin is not close enough to Eaglewing at
the end of the Charge to Melee attack him with his scimitar. The orc
throws his spear at Ariella and misses. The goblin fires his
Crossbow at Delion and hits him, profiting from the 20% bonus for
attacking Delion from a Rear hex. Delion takes 9 points of Fatigue
damage (4 of which is absorbed by his leather armor) and becomes
Stunned. He is unable to hold on to his rapier, which falls to the
ground. Now the party may act. Eaglewing, having prepared his tulwar
upon becoming aware of the ambush, sets himself to receive the
hobgoblin's Charge by taking an Evade Action (he has achieved Rank
5 with the tulwar, so he thinks he has a good chance to Parry).
Ariella prepares a spell, and begins to pronounce the magical
incantations. She may not move. Delion acts last as he is Stunned.
He may only attempt to recover from Stun; he tries and fails.
Second Pulse:
The Initiative roll is won again by the hobgoblin. He Charges
Eaglewing and attacks. His Strike Check is 37% above his Modified
Strike Chance, so Eaglewing may Parry. He rolls an 8, plus 6 for his
Rank, minus 3 for the hobgoblin's Rank, yields a result of 11: a
Disarm and Riposte. Eaglewing hits the Hobgoblin with his Riposte,
doing damage affecting Endurance for 12 points. The hobgoblin is
Stunned, and the GM checks to see if he falls from his horse. He
does, and falls at Eaglewing's feet. The orc prepares his scimitar
and moves slightly towards Delion. The goblin begins to reload his
crossbow. Eaglewing attacks the prone hobgoblin (the Riposte does
not count as an action), receiving a 15% bonus for the hobgoblin
being Stunned and a further 20% for his being prone (the hobgoblin's
Defense is not subtracted because he is Stunned). Eaglewing strikes
for a Grievous Injury this Pulse and kills the unfortunate
hobgoblin. Ariella tries to cast her spell of Starfire (knowing full
well she is receiving a 20% penalty because it is still daytime) and
succeeds, doing 13 points of damage to the goblin, who becomes
Stunned and drops his bow. Delion tries again to recover from Stun,
and succeeds.
Third Pulse:
This time Eaglewing wins the Initiative Roll (performed against the
orc since the hobgoblin is dead). Since no one is engaged yet (the
hobgoblin does not engage Eaglewing because he is dead), he chooses
to have the party act first. He prepares his main-gauche, and
moves slightly towards the orc. Ariella begins to prepare another
Starfire spell. Delion picks up his rapier and changes facing to
receive the orc's attack. The orc moves up to Delion and Melee
attacks him, missing. The goblin recovers from being Stunned.
Fourth Pulse:
Initiative is rolled between Eaglewing and the goblin, since the orc
is engaged with Delion. Eaglewing wins it. However, since the orc
and Delion are engaged, their combat is resolved before anything
else. The orc's Initiative Value is 27, Delion's is 25, so the
orc may act first. He attacks Delion, inflicting enough Fatigue
damage with his successful attack that Delion is out of Fatigue
(remember, the party was tired to begin with). Delion, seeing the
way the battle is going, Withdraws defensively. Eaglewing chooses to
have the party act first and allows Ariella to try her spell before
he himself takes any action. Ariella, however, is not so lucky this
time and her spell backfires, reducing her Fatigue to zero and
Stunning her. Eaglewing (frustrated at the Adept's fumbling) moves
up to the orc, attacking him from behind. He receives a 30% bonus
for attacking from a Rear hex but a 15% penalty for Charging with a
non-Pole weapon. However, his attack is successful, doing
enough Fatigue damage to Stun the orc. Delion cannot act now because
he has already performed an action earlier in the Pulse. The goblin
runs away.
Fifth Pulse
Eaglewing asks the orc to surrender and the orc accepts, thus ending
the need for the Tactical Stage.